Total Pageviews

Monday 28 May 2012

THIS IS HOW IT STARTS... & UK GAMES EXPO 2012

This post was going to originally just be about the UK Games Expo 2012 but saw this and had to mention this for all the Zombie lovers out there, here's the text from the amazing IO9 site:

"A scary bit of news is coming out of Miami this weekend after the city police shot a naked man found eating another man's face. And several circumstances of the story have some people crying zombie.
The police were called in yesterday after the attacker was spotted on the MacArthur Causeway off ramp. When the attacker failed to back away at the officer's request, the officer shot the attacker.
Now it's one thing to eat another person, and it's quite another to eat another person and then continue eating after you've been shot. Witnesses claim the officer fired half a dozen shots before the attacker finally stopped. The attacker was killed, and the victim is currently in the hospital.
This is obviously a great tragedy, one that's left one man dead and another disfigured, and the police are theorizing cocaine psychosis rather than zombification as the cause of the attack. But residents of Miami can rest easy in the knowledge that the police are prepared to nip any zombie outbreaks in the bud"

http://io9.com/5913643/how-the-zombie-apocalypse-starts-naked-man-found-eating-victims-face
http://www.miamiherald.com/2012/05/26/2818832/naked-man-shot-killed-on-macarthur.html

If you live in the states and are reading this keep an eye on Miami and keep us up to date :)

Anyway back to my original post,

Got back from my first trip to the UK Games Expo in Brum yesterday, overall it was pretty good I was hoping there'd be a little bit more in the way of terrain or interesting displays but for £8 entry fee I can't complain. I was hoping to nab some terrain bargains, barrels and the like but there wasn't much on that front but I did grab some interesting mini's


Thought I'd give some of the Dreamblade pre-painted mini's a go as I've seen some great stuff on other peoples blogs and as Tritex games had a big bucket of Dreamblade fugures for £1 a pop why not.
I think these fit in with the vaguely Thingesque back-story I'm coming up with for my zombie apocalypse and  hopefully when primed, based and given a suitably gruesome paint job they'll fit right in.
Here's a scale shot with a 28mm fig for reference:

I've already removed the big plastic bases from a couple which was tougher than I imagined.
I also got the following from the Expo:

I grabbed these (two at the front) from a lucky dip bucket of lead, no idea of the maker possibly Grenadier they should work well as part of a nautical themed group of figures that I'm trying to put together, so far it's just those two fishmen and the large fella that's a Harlequin troll of some description that I snapped up for 99p on ebay recently.

Also at the Expo were Z war one who were showing off their Zombie themed board-game that should be out later in the year, I didn't have a chance to give it a try but from talking to the guy running the stall (I'm terrible with names) it sounds pretty cool and involved an XP system, interesting  movement mechanics and in future they hope to put out some boss type Zombie mini's which I look forward to seeing. Thankfully they had packs of their Zombies and survivors on sale so I nabbed a pack of each and at £10 for both packs I think I got a good deal:


Here's the rest of my Expo swag:
Chests and baskets, all for £1, I've no idea what I'll use these with but you can never have enough in the way of cast up detritus
Lastly is this scibor chaos mutant that again will work as a decent tank sized zombie with a little work.

Enough of the Exop for now and onto the painted goods:

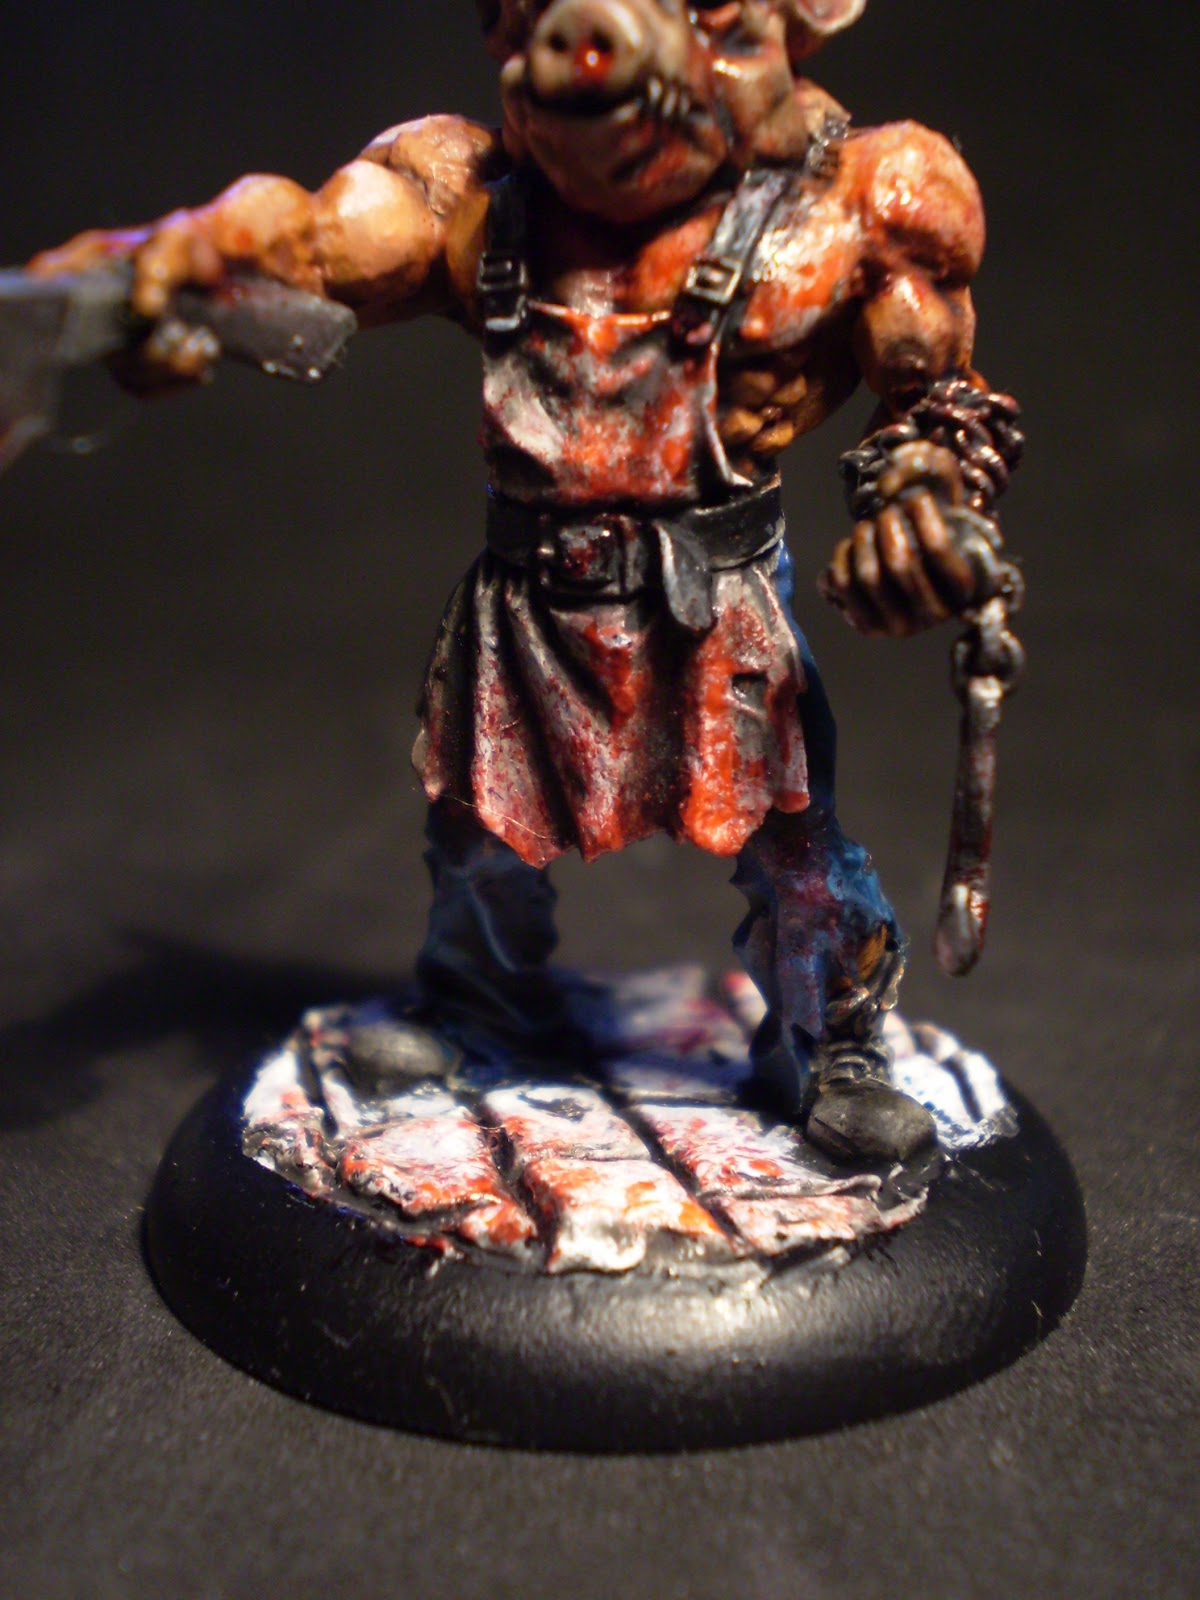
Not a huge amount on the painted mini's  front recently, just two mini's for now, copplestone zombie and a spinespur guy:

I'm not sure how he's going to fit into a zombie apocalypse setting but he would work as a crazed survivor.


 And here's the horde as it stands at the moment:

I also nabbed a ton of horrorclix freakshow figures on ebay for a good price, there's quite a few multiples so If anyones after anything drop me a message and I'll see if I can help you out, here's the listing if you want a look:
http://www.ebay.co.uk/itm/330732489779?ssPageName=STRK:MEWNX:IT&_trksid=p3984.m1439.l2649#ht_2120wt_1344

That's it for now, but remember keep an eye on Miami...


Thursday 17 May 2012

MORE PAINTED ZOMBIES

First off howdy to all the new people that have joined the blog I'm almost breaking the 50 people mark here which is pretty cool. If you have any interest in zombies gaming you should get yourself over to the board of the living dead (http://boardofthelivinglead.proboards.com/index.cgi) as this seems to be the congregating point for the Zombloggers that have inspired me.

Anyway on to the mini's, I finished a couple more Zombies for the Horde last night:

From left to right, two Copplestone plague zombies, a Forlorn Hope games zombie (http://www.forlornhopegames.co.uk/#/item.php?PK_UniqueID=4077) and a Lead Adventures Child of The Zone

First up is one of the Copplestone Plague Zombies from the Future Wars Range on a home made base, I think he's turned out a little too shiny but should look better once I get hold of some matt varnish.

Another Copplestone plague Zombie that for the life of me I couldn't get to focus but you get the idea. I think his suit needs something adding to it like possibly stripes but for now he will remain in his boring grey suit until I see something to copy off.


Next up is the unknown Zombie that I got from Forlorn Hope games, I've tried to capture an older dryer zombie finish for this guy and left off any reds so he looks more 'husky'. I get the feeling that he's been stuck in a hospital room for some time and has finally managed to escape and is dragging a section of metal from the door frame.


Lastly is this saggy mess from the Lead Adventure post apocalyptic range, he's part of the Children of the Zone set which includes some fantastic mini's. If you've ever played S.T.A.L.K.E.R you should check out the whole range as it's pretty much the character models from the game recreated in 28mm. I've just realized that he is actually supposed to be wearing trousers  and not be completely naked (check out the pic in the link http://www.lead-adventure.com/product_info.php?cPath=1&products_id=49)
When I was painting him I didn't realize it was supposed to be trousers and painted him up starkers. I just thought he had exceptionally saggy flesh from the huge stomach wound but thinking about it further in hindsight he doesn't seem to have anything in the way of genitals so maybe that should have been a trousers based clue. Nevermind he can now forever be a saggy nude eunuch zombie.


Also this week I finally received my first box of Wargames Factory plastic Zombies. I've seen these in a lot of peoples blogs and wasn't to impressed with the quality of the sculpts but when a box of 24 popped up on ebay for £9 with free postage I took the plunge and at £0.37.5p a zombie I can't really complain.
I'll post up a proper look at the figures whenever I get round to painting and assembling them.

I never know how to end a blog post so..........bye


Saturday 12 May 2012

RUSTY SKIP

I've just finished a couple of building site style skips based on this picture:
I was initially going to buy some skips from Fenris games but thought I better give making some a try before spending money that I could be spending on mount leadverest. The ones Fenris are selling are the more 'traditional' looking skips that you would hire if you were doing some heavy DIY, but due to the materials that I have I've gone for a bigger more heavy duty skip.

Here's the finished first Skip:

All it needs to finish it is some kind of stencil logo or company name across the middle and it's done:
I've put together a step by step below if anyone wants to give it a shot themselves:

Here's the tools and materials needed:
Materials
1. The Main body of the skip is a .22 bullet box that I received as packaging  for some ebay mini's, I've no idea how easy these are to come by in the UK but American readers shouldn't have any problems :)
2. Matchsticks, I got a big pack of these from 'The Works' (Discount Art & bookstore)
3. Coffee stirrers, I managed to grab a ton when I was at London zoo that should keep me going for an age
4. Cocktail Sticks, these came from poundland 6 packs for a pound
5. Lastly some old business cards of mine
Tools
Super Glue, Sprue clippers, drill, craft knife, scissors.

Step one:
Cut one of the business cards or similar thin card into equal width strips, I used three strips for each long side, make sure you leave a small gap between each strip

Step Two:
Glue the three strips to each long side and trim off any excess on the ends
Once these were dry I scratched up the surface with the blunt side of a knife to give the surface a more worn look.
 Step 3.
Take your coffee stirrers cut the rounded ends off and then cut the stirrers in half lengthways so you end up with a load of skinny strips.
Next cut your newly slimmed down stirrers into 16 equal length sections (6 for each long side and two for the shirt sides). When you glue these to the sides make sure you leave a small gap at the top of each of the long sides ready for the trim.

Step 4.
Take your match-sticks and glue them to the small gab that you should have left above the coffee stirrers. On the shorter sides add three match sticks (top, Middle and bottom)
Step 5.
For the truck hitch (I think) at the end of the skip again get your coffee stirrers out and cut off two equal length short sections. Drill two small cocktail stick width holes in each section and attach them to your cocktail stick and then to the interior of the skip. Once this is attached to the skip you can trim off the excess  cocktail stick.

 Step 6: Painting

I undecorated the whole thing black, when painting I didn't really worry about the neatness of the undercoat as I think a thick lumpy finish helps with the final battered look of the skip. Once the undercoat was dry I gave it a coat of Snakebite Leather then gave it an uneven wash of Gryphonne Sepia
 Once this was dry I highlighted the skip with Desert Yellow then Sunburst Yellow.
To get the rusty finish I picked out some of the edges and surfaces with bestial Brown, then Blazing Orange and finally Mithril Silver decreasing the amount with each colour.

Here's the finished Skip
 
Let me know what you think and let me know if you think anything needs adding to the guide

I also knocked up some refuse from excess green stuff, I was trying to capture the shiny black bin-bag look but I think I've got a little too heavy on the white, I'll probably revisit them and give them a black wash to knock them back. Inspired by the Brians and Guts blog I decided to create some pallets but got bored and only managed one :)